|
|
|
|
|
|
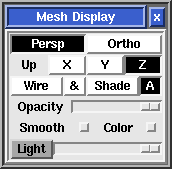 Fig 1. Mesh Display - Persp Ortho
- Toggle between a perspective and orthographic camera. You can also use the <O> key in the 3D window to flick between these two.
- Up X Y Z
- When rotating the view with the <LMB>, the mesh will spin about its Up axis. If you load your mesh and its appears to by lying on its side, try a different Up axis to get it upright. Alternatively, you can use <Ctrl-LMB> to spin the mesh around the center of the window until its Up is correct.
- Wire
- When selected, the mesh is always drawn using a limited number of wire-frame triangles. This is the fastest display mode, but you will need to use the <S> key to see the mesh shaded.
- &
- The mesh is drawn in wire-frame when the view is being changed, and is shaded otherwise.
- Shade
- The mesh is always drawn shaded, even when changing the view. This can be slow if your mesh is very detailed.
- A
- Automatic, where one of the above settings is used depending on the number of triangles visible.
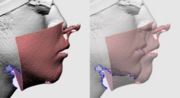 Fig 2. Mesh Opacity - Opacity
- Drag the slider to the left to make the mesh more and more transparent. This is mostly used in PlyEdit when lining up imported meshes (see Fig 2).
- Smooth
- Turns on smooth shading whenever the mesh is drawn shaded.
- Color
- Turns on the CPV or UV color whenever the mesh is drawn shaded.
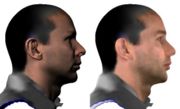 Fig 3. Light On and Off - Light
- Drag the slider to the left or right to change the direction of the light source used when shading the mesh. Click the Light button itself to turn the light source on and off; you might do this if you want to see the mesh's color without any surface shading (see Fig 3).
|


