|
|
|
|
|
|
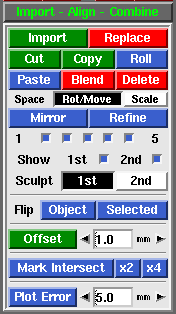
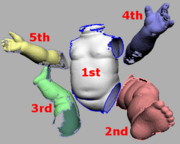
 Fig 1. Import Align Combine  Fig 2. Mesh Colors - Import
- Load in another PLY file as a separate mesh. Fig 2 shows the different coloring applied when multiple meshes are loaded. As you can see, its possible to have many meshes loaded, but only the 2nd "red" mesh can be moved around or sculpted. To avoid confusion, its recommended that you only work with 2 meshes at a time, that is, the 1st "white" mesh and the 2nd "red" mesh.
-
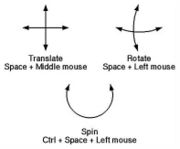
 Fig 3. Postioning Meshes
- Replace
- If two meshes are loaded, a file selection window pops up, and the PLY selected will replace the 2nd mesh. If three meshes are loaded, the 2nd is deleted and the 3rd is moved into that position. This tool is normally used to substitute a hirez mesh for a decimated copy that has already been positioned in the scene.
- Cut
- Removes <G> marked faces from the 1st mesh and puts them into a new mesh at the end of the list.
- Copy
- Copies <G> marked faces into a new mesh.
- Roll
- Changes the mesh ordering by one step. If there's only 2 meshes, this swaps the 1st and 2nd meshes around.
- Paste
- Copies the faces in the 2nd mesh into the 1st mesh, then deletes the 2nd mesh.
- Blend
- Smoothly blends in faces from all the other meshes, then deletes those meshes. You will be prompted for a brush size in the 3D window; if the overlapping faces aren't intermixed that well, then you may want to increase the default brush size to make sure that faces further apart are still blended together. If the brush size is too small then you will end up with a double skin in the overlapping areas.
- Delete
- Delete all other meshes, leaving just the 1st mesh.
- Space Mode
- Normally the 2nd "red" mesh is rotated by holding <Space> then click'n'dragging the <LMB>, and moved with <Space-MMB>. For safety reasons, you can only scale the 2nd mesh by first selecting Scale next to the Space option, then use <Space-RMB> to resize.
- Mirror
- Mirrors the last mesh in the list about the Y-Z plane (i.e. its X coordinates are reversed).
- Refine
-
When you are happy with the initial position, select the Refine button. In the CyEat Display window you will see a whole bunch of wobbling error vectors. These illustrate the differences between the two meshes, and throughout the refinement process they should get shorter and shorter.
- Show
-
- Sculpt
-
- Offset
-
- Flip
-
|
