HLServer: Application Config
From Headus Docs
|
Applications using floating licenses are installed as they normally would be on the client workstations. Its perfectly OK to also use NFS or some similar network file system to share files.
When an application is run, and if no local key is found, the license server is contacted. If no local or floating licenses are available, the application will not start and the headus licensing GUI will start up. If you ever need to start the licensing GUI directly, use one of the following ways:
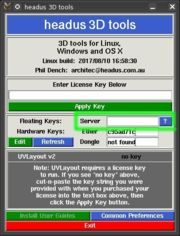
[edit] Newer GUIThese are the config instructions for applications built from about September 2017; see the section below for older applications. If the user's workstation or laptop is on the same subnet as the license server, and you've configured HLServer with the default of "PORT 11668" in hlserver.conf, then they can click on the blue "?" button to search for the license server. If the server can't be found, or is on a different subnet, then users will need to type the server IP address into the Server field, then click the blue "?" button to test the connection. Once the server has been set, the "?" changes to a right arrow; it will have four different colors:
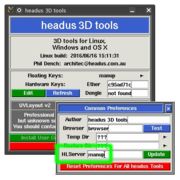
[edit] Older GUITo get the older applications to talk to the license server, click on the Common Preferences button (see Fig 2). Enter host into the HLServer field (where host is the hostname or IP address of your license server). Click the Update button to check that the floating licenses have been found. Note: Normally the host port number can be left off if you use the default of "PORT 11668" in hlserver.conf. If a different port has been used, or you are using older client applications, then it needs to be added to the hostname with a colon, as in host:port (e.g. "lserver:11668"). [edit] Environment VariableIf you are a systems admin wanting to set the license server host for all of your users, then you can use the HEADUS_HLSERVER environment variable as an alternate to the method described above. If installing onto OS X or Linux, you can put your setenv commands into /etc/csh.headus, and the start-up scripts will then run in that environment. An example /etc/csh.headus would look like: setenv HEADUS_HLSERVER lserver Alternatively, put the name of the license server into a file called hlserver.txt, and put that into the "lib" folder where the client software (e.g. UVLayout) is installed. It should be in the same location as the empty keys.txt file. An example hlserver.txt would just say: lserver [edit] Application RestoreThe link between the license server and applications is via connected TCP/IP sockets. This means that a connection has to be maintained at all times during the life of an application. If the connection is dropped, then the application loses its license, and the default action is for it to exit without warning. Possible reasons for a broken connection are:
The restore function allows users to define a directory where all current work is saved when a license is lost, and the application can be restarted from this save point. Note: Currently only CySlice and associated products (.i.e PlyEdit, CySize, UVLayout) support the restore function. To set the restore directory, each user needs to run the headus licensing GUI using one of the following ways:
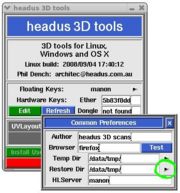
Once the licensing GUI is running, click on the Common Preferences button (see Fig 3). A directory name can then be entered into the Restore Dir text field; hit <Enter> to save the change. The restore directory should be on a local drive, not a networked drive/share, in case the loss of license is through a network problem or server reboot. The selected directory should also be one that's maintained through a reboot of the local system; RAM drives and temporary areas that are cleaned out on reboot shouldn't be used. Once the restore directory has been defined, applications run from then on are protected by the restore function. If a license is lost, the application dies as per usual, but a restore window will then appear (see Fig 4). If a user sees this window, they should first talk to a systems administrator to determine the cause of the loss of the license. If a server is down, they will need to wait until that is rebooted before trying to restore the application. If HLServer is down, that will need to be restarted. When all services have been restored, the user can click on the Restore button; the application they were running will be restarted, and all saved work is reloaded. Once all that is up and running, the restore files can be removed with the Delete Files button. If for some reason the restore window is killed before the user is able restore the application, they still have one more chance to recover all their work. Open up the most recent restore*.txt file in the assigned restore directory, and look for the "Can restore with ..." line; follow the instructions to manually run the restore function. And if that fails for any reason, the data files themselves will also still be in the restore directory; the application can be started as it normally is, and these file manually loaded to recover the lost work. |


