 |
headus 3D tools / 3D scans
Support Forums
|
 |
| View previous topic :: View next topic |
| Author |
Message |
b514c4fa
Posts: 11
Joined: 01 Mar 2011
|
 Posted: Tue Mar 01, 2011 2:00 pm Post subject: UV size based on camera distance Posted: Tue Mar 01, 2011 2:00 pm Post subject: UV size based on camera distance |
 |
|
Is it possible to somehow use a camera distance pass or bake out to affect the size/weight of UVs being mapped? I have a scene with a lot of large textures, and would like to preserve the detail near the camera. But far away I would like small and efficient, producing less noise, etc.
Dave |
|
| Back to top |
|
 |
headus
Site Admin

Posts: 2907
Joined: 24 Mar 2005
Location: Perth, Australia
|
| Posted: Tue Mar 01, 2011 6:01 pm Post subject: |
|
|
Sorry, its not currently possible, but its an interesting idea!
Do you need weighting on a per polygon basis, or would rescaling of already flattened shells be enough you think? The second method would be the easiest to code, and the easiest to use too. You'd flatten your scene out as usual (I'm guessing its like a street scape?), position the camera and click the "Scale to Camera" button, then you'd just have to repack the re-scaled shells.
Phil |
|
| Back to top |
|
|
b514c4fa
Posts: 11
Joined: 01 Mar 2011
|
| Posted: Wed Mar 02, 2011 1:39 am Post subject: Scaling flattened shells is probably best |
|
|
Yeah, that is the concept. You could scale already flattened shells as long as the shells are not extending across a wide amount of camera distance. But if the shells are for some reason extending from very near to the camera to very far from the camera all within a single shell (think of a flat roadway or sidewalk heading off to infinity; the UVs would probably shot from a top camera, and be close to flat already), why be stuck with high resolution maps far from the camera? The amount of scaling that is appropriate would be a function of the available pixel density in the foreground and background. In the foreground the point would be to preserve as much detail as possible. In the background the point would be to reduce the amount of image map that is feeding into a single pixel to a reasonable amount. Lets say for example that for some other shot your background has been painted at very high resolution, and you have the equivalent of 32x32 pixels feeding into a single pixel. That extra data isn't helping your render times, and has the potential of creating noise problems. You probably wouldn't want more than something like a maximum of 16 pixels (4x4 pixels) feeding into a single pixel, or too much less than that to avoid anti-aliasing problems.
You can solve this by writing a distance-based shader, using high res textures close to the camera, and lower ones farther away. However, then you have to load all of that texture space during a render, including both all of the high res maps and the smaller ones. What you really want is all of the texture space baked out into one reasonably sized map so the render is fast. Or at least to be able to minimize your maps as much as possible.
So, how would one achieve this? I think it is just a mathematical transform of one UV map on top another. One map is based on your current UV layout, and marks the initial position of second map UVs. The second map, which temporarily has the same UV positions as your starting map, is given polygon areas that are weighted by a distance-based bake out. For example, I have done this type of distance-based bake out in Modo by applying a white (near) to black (far) gradient, where the distances for near and far span the range of camera distances within a scene; then bake to texture. So the information is easy to obtain, at least in some programs. It is kind of like a depth pass for UVs. See for example the attached, where I have baked out the camera distance to the UVs. By the way, this map was originally flattened in Headus, but was re-packed in Modo on a new UV map; eventually the old maps and data have to be baked on to the new map. Part of the calculations might be to average the weights within a polygon, or across an edge...
The part where Headus could help is in flattening the second area-weighted map, and using the flattened weighted map to transform the first map by stretching areas where preserving detail is important, and compressing areas where detail isn't required. It would be nice to be able to set your minimum pixel density. For example, you wouldn't want to compress to something too small, or you would end up with aliasing problems. It would also be nice if you could somehow automate the process based on several frames, or even a whole shot worth of frames. The thing you care about is the closest distance to camera during a shot. That would be picking the brightest of a series of bakeouts. That brightness should determine the size of the pixel density that is matched to your shot.
Anyway, the transforms should be a piece of cake for you guys at Headus.
The other possibility I suppose is using a projection-based system, for example as in Nuke, where a texture is projected onto a surface. But if you think back to the road/sidewalk example, a top projection of the sidewalk would still require the large texture space. There the compression is happening during the render within this system. In the system I describe above the compression would be happening before the render. |
|
| Back to top |
|
|
headus
Site Admin
Posts: 2907
Joined: 24 Mar 2005
Location: Perth, Australia
|
| Posted: Wed Mar 02, 2011 2:30 am Post subject: |
|
|
There's a couple of ways of handling this ...
A) All within UVLayout, which means you'd have to use the very basic camera controls in UVLayout to select the key views you wanted for the weight averaging, or ...
B) UVLayout just does the reflattening, and the pre-computed weights come in via a map like the one you have above. It would then be your responsibility to compute and average the weights over your key frames. On the plus side though, you'd have complete control over the weights you'd be feeding to UVLayout, and there would be nothing stopping you from experimenting with other weighting algorithms.
Phil
Last edited by headus on Wed Mar 02, 2011 8:34 pm; edited 1 time in total |
|
| Back to top |
|
|
b514c4fa
Posts: 11
Joined: 01 Mar 2011
|
| Posted: Wed Mar 02, 2011 7:07 am Post subject: UVs Based on Camera Distance |
|
|
Sounds great. I actually like the idea of being able to control it with a map. You could for example select polys visible to camera, inverse the selection and make those black on the map, etc. So it might be nice to have that option.
When will that be ready?
Dave |
|
| Back to top |
|
|
headus
Site Admin
Posts: 2907
Joined: 24 Mar 2005
Location: Perth, Australia
|
| Posted: Wed Mar 02, 2011 6:54 pm Post subject: |
|
|
A day or two. What build of UVLayout (i.e. Win, Mac, Linux) are you using?
Phil |
|
| Back to top |
|
|
b514c4fa
Posts: 11
Joined: 01 Mar 2011
|
| Posted: Wed Mar 02, 2011 8:11 pm Post subject: UVs Based on Camera Distance |
|
|
Wow, that is awesome Phil. I was really being a little tongue in cheek, not expecting that you would get to it so quickly, so that is really great. I definitely have a use for it as soon as you are done. Can't wait to try it out. I am using Windows 7, 64 bit, 2010/04/08 16:51:35.
Dave |
|
| Back to top |
|
|
headus
Site Admin
Posts: 2907
Joined: 24 Mar 2005
Location: Perth, Australia
|
| Posted: Wed Mar 02, 2011 8:31 pm Post subject: |
|
|
You caught me at a good time (no deadlines on other jobs) and I don't think its going to be that hard to code. All of the per-polygon weighting code is already in there (from the 4/5 local scaling brushes) so its just a matter of reading in the map and applying those values. Whether it actually turns out to be that easy is another thing :)
Phil |
|
| Back to top |
|
|
headus
Site Admin
Posts: 2907
Joined: 24 Mar 2005
Location: Perth, Australia
|
| Posted: Thu Mar 03, 2011 12:56 am Post subject: |
|
|
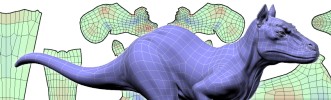
Here's some pics of the new "Load Weights" tool in action. I just painted a gray scale map for my weights, but your camera based weights should work also.
So the first pic shows the usual flattened UVs. Those furthest from the camera are compressed, wasting texture space if this is the only viewpoint the object is seen from.
Next pic shows the grayscale weights map and after its been loaded into UVLayout. You get to define how black and white in the map relate to the poly weights, so I've used 0.5 (half size) for black, and 1.5 (50% bigger) for white.
Final pic shows the shell after its been reoptimized. Now polys further away from the camera are given less texture space, and those closer are getting a bit more.
One thing to note is that each polygon can only have a single weight, and that's extracted from the map at its center point. If you have a long polygon that goes from near to far (e.g. that road you mentioned) then this weighting will only work if its subdivided along its length into a number of smaller polys (i.e. model it as a grid instead of a one single polygon).
I'll do a bit more testing, and will upload a new installer either later today or tomorrow. I'll post here when it ready.
Phil |
|
| Back to top |
|
|
headus
Site Admin
Posts: 2907
Joined: 24 Mar 2005
Location: Perth, Australia
|
| Posted: Thu Mar 03, 2011 3:09 am Post subject: |
|
|
The new update is ready to grab from your uvlayout.com Support Extras page ... its the iuvlayout-pro-2.07.01d.exe file.
So once you have that installed, load the file you want to re-optimize, open up the "Move / Scale / Rotate" panel and you'll see a new row of buttons under the Local Smooth Reset ones. The two values are the multipliers for black and white. If you want black polys to get smaller, but white ones to stay the same size, then set the second multiplier to 1.0 (its 2.0 by default).
Next, turn on the local scaling display (its the grey button between "Local" and "Smooth") and everything should be white. Then click on the arrow right at the end of the second row and a file selection window will pop up, and that's where you select the grayscale weights map. You should then see all polys recolor according to the selected map ... red polys with shrink, and blue ones will expand. If you want to adjust the multipliers, you need to reload the grayscale map to apply those changes to the mesh.
OK, all you have to do then is re-optimize (i.e. click "Run For" under the Optimize panel). All polys should then be scaled according to your weights map.
By the way, it hasn't had much testing ... this is very much hot off the press! So if you find anything broken, let me know and I'll fix it.
Phil |
|
| Back to top |
|
|
b514c4fa
Posts: 11
Joined: 01 Mar 2011
|
| Posted: Thu Mar 03, 2011 7:52 am Post subject: woW Thats fast! |
|
|
It turns out my support lapsed about a month ago, and I just figured that out. I started renewing the support today, but that renewal apparently takes about 24 hours, so it looks like I will be able to try it out by tomorrow. I will let you know as soon as I test it.
Thank you!
Dave |
|
| Back to top |
|
|
b514c4fa
Posts: 11
Joined: 01 Mar 2011
|
| Posted: Thu Mar 03, 2011 2:51 pm Post subject: More Ideas |
|
|
Phil,
This is going to be so great, I can't wait to get my updated support thingy, so I can download. In the meantime, I have some more ideas.
Right now the process is manual, which I like, but there might be some things that you want to automate or provide switches for. For example, the maximum weighting factors and the minimum weighting factors, currently controlled by the 0-1 grayscale of the map, might be more appropriately tuned or linked to other things. For example, the input size of the map(s) you are baking from, and the size(s) of the maps you are baking to.
In general people want to maximize the quality their bakes. But if say you over-enlarged the UV space for foreground polys, you wouldn't gain any resolution beyond the limit of your original paint. So the pre-existing paint quality should lock the maximum weighting of foreground polys. Once locked the compression of the distant polys should be increased gradually until you maximize the UVs in the available UV space.
The converse is the aliasing problem you could get if the background polys are baked too small. You want a certain min pixel density to prevent aliasing.
Both of those two endpoint criteria are affected by the map sizes, both of the original paint map size and final UV map size.
Finally, what about polys that are close to the camera, but which never appear in frame? This information could be generated by baking white, and using that as a projection texture from the perspective of the camera on top of a black background. That image would be multiplied on top of the distance-from-camera bake. Polys not seen by the camera would then be black, and should receive zero UV space! That means that your end point for the farthest distance from the camera has to be something other than black, say 6 or 7 % black, discernibly different than black on most screens.
In the process I have outlined above, I am using Modo for the bakes. I have a suggestion: contact Tobiah at Modo. Modo 501 has a developer package, and this seems like the perfect app for it. They are not as fast and nimble as you are with their UV tools, and you would have to write some sort of scene baking program. The best thing might be to work together to make all of the above a one button solution.
Dave |
|
| Back to top |
|
|
headus
Site Admin
Posts: 2907
Joined: 24 Mar 2005
Location: Perth, Australia
|
| Posted: Thu Mar 03, 2011 7:11 pm Post subject: |
|
|
I guess my initial thoughts are that most of what you want could be handled outside UVLayout. Once you've generated the "camera to polygon" distance maps, a lot can be achieved by manipulating the grayscale levels of the initial map in a paintbox.
Something like Gimp's Levels tool would allow you to adjust the histogram, so you can push more pixels to the light or dark ends for example, or set minimum vales etc. With a bit of trail and error, you'd be able to work out what tweaks to the grayscales are needed for different map and render sizes.
By keeping UVLayout really dumb (it just applies the weights, not caring or knowing they're actually distances), you're going to have a lot more control over the final results.
Phil |
|
| Back to top |
|
|
b514c4fa
Posts: 11
Joined: 01 Mar 2011
|
| Posted: Wed Mar 09, 2011 1:04 pm Post subject: UV size based on camera distance |
|
|
Okay, Phil, sorry about the delay, but I got busy. What I did was actually make the proverbial road scene we have been talking about, originally using a Modo tiling texture (Modo 501 very conveniently has a road texture). But as I describe in a little more detail below, this is probably a bad example to show off this particular new feature.
What doesn't work: keeping all UVs within one shell. The way this is set up right now, if it is in one shell for something long and thin like a road, the mesh gets all twisted up and seems to take a long time to unpack. It seems to be working, but taking so long I got bored and stopped the flattening and tried shift F for the rapid flattening by edges. That didn't help, so I undid. So one nice improvement might be to change Shift F flattening subroutine to work better in some way, but I am really not sure how this normally very nice subroutine works anyway. Possibly weight edges based on the weight map?
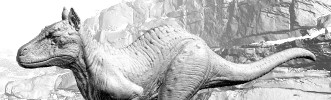
However, when there are multiple shells, it seems to be working per polygon and very quickly within Headus, doing the stretching much more as I had anticipated, as shown in the attached images.
Overall, the stretching works great. But I would advise users to break up their shells enough that it has a chance to work efficiently in terms of time. Multiple shells also allows the packing to take advantage of the weighted space anyway.
This probably sounds pretty obvious, but the whole exercise reinforced the value of a good tiling texture for me. In the case of the road, my original UVs were a rectange mapped to the 0-1 UV space, and I tiled the road texture once in the horizontal, and 30 times in the verticle. Whether using a tiling texture or the baked out version (tile and bake were 1024x1024), Modo was taking 8.9 seconds to render, either way, but the resolution of the tiling texture was much better. In order to maintain the quality I had to bake out at 8k, and then the render took 9 seconds to render, and didn't look quite as nice as the tiling texture. So if a tiling texture is working for you already, that is the way to go. However, if you have multiple textures that you can't tile, and you are trying to bake down to one texture, then your new distance-based UVs are working really well. The new Headus Distance-Based UVs are the way to go.
Thank you so much for your great work!
Dave |
|
| Back to top |
|
|
b514c4fa
Posts: 11
Joined: 01 Mar 2011
|
| Posted: Wed Mar 09, 2011 4:13 pm Post subject: UV size based on camera distance |
|
|
I just tested changing the weight factors (the ones with defaults 0.5 and 2 in Headus) with the lower factor set to zero. That results in zero map space for things on the weight map that are black. That is working perfectly.
Dave |
|
| Back to top |
|
|
|
|
You cannot post new topics in this forum
You cannot reply to topics in this forum
You cannot edit your posts in this forum
You cannot delete your posts in this forum
You cannot vote in polls in this forum
You cannot attach files in this forum
You cannot download files in this forum
|
Powered by phpBB © 2001, 2005 phpBB Group
|

