| View previous topic :: View next topic |
| Author |
Message |
Rich-Art

Posts: 120
Joined: 29 Dec 2005
|
|
| Back to top |
|
 |
headus
Site Admin

Posts: 2907
Joined: 24 Mar 2005
Location: Perth, Australia
|
 Posted: Mon Apr 26, 2010 10:05 pm Post subject: Posted: Mon Apr 26, 2010 10:05 pm Post subject: |
 |
|
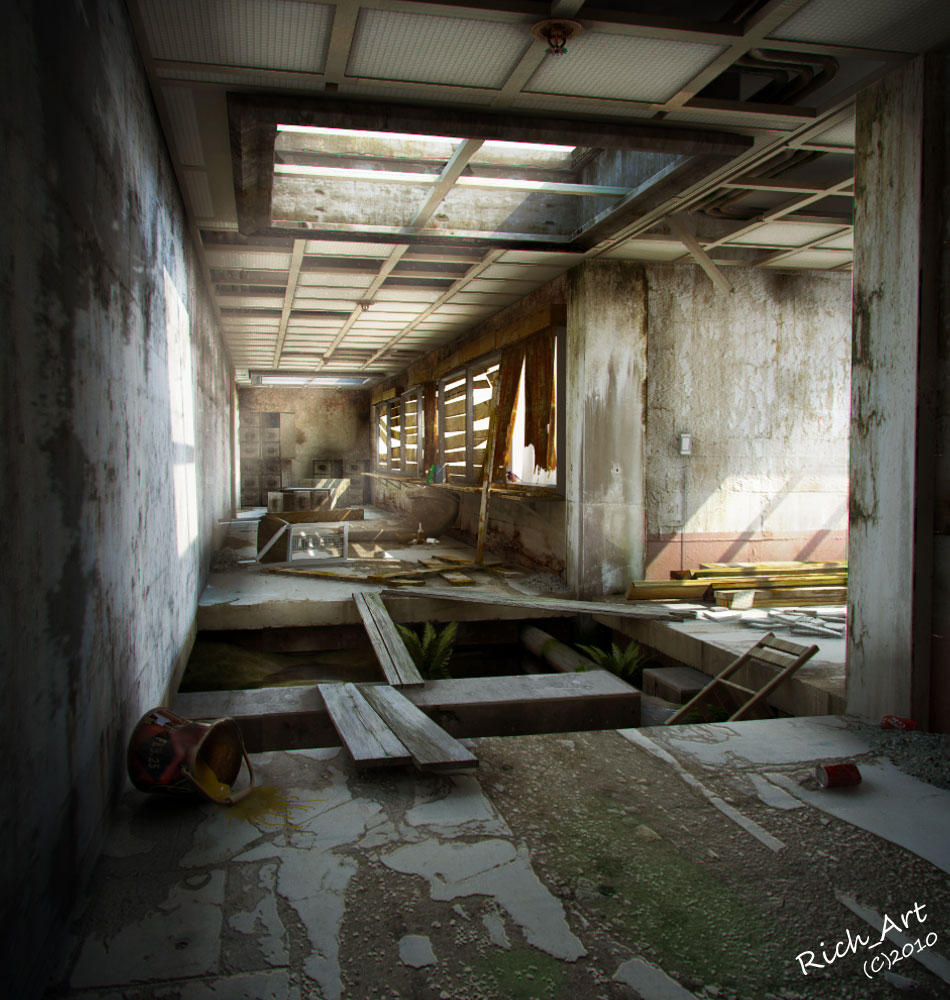
Nice! Because its lots of boxy shaped things, did you use the Segment tool?
Phil
|
|
| Back to top |
|
|
Rich-Art
Posts: 120
Joined: 29 Dec 2005
|
| Posted: Mon Apr 26, 2010 10:53 pm Post subject: |
|
|
Thanks Phil,
Yeah I used the segment tool for almost all the objects.
And the new function for unwrapping pipes (R key) works great as well.
Peace,
Rich_Art. 
|
|
| Back to top |
|
|
Josephus
Posts: 2
Joined: 10 May 2010
|
| Posted: Mon May 10, 2010 12:57 pm Post subject: |
|
|
| Rich, that is very nice. I'm just at the place in my 3d modeling/rendering that I need to start painting textures like this to my architectural models, hence my interest in UVLayout. I do have c4d 10.5/bodypaint, I've played with some of the basics but having a bit of a difficult time grasping it. A totally "noob" question...once you get your uv layout/maps in UVLayout, do you paint inside UVLayout or export to Photoshop, and then re-assign those images back in UVLayout? Any explanation would be extremely helpful.
|
|
| Back to top |
|
|
headus
Site Admin
Posts: 2907
Joined: 24 Mar 2005
Location: Perth, Australia
|
| Posted: Mon May 10, 2010 7:51 pm Post subject: |
|
|
The basic work flow is that you load the model into UVLayout to create the UV coordinates (i.e. the flattened out pattern) and then save the model back out. You can also use the "Render" tool in UVLayout then to save the layout to blank texture maps.
If you load these maps into Photoshop you'll be able to see the UV coordinates drawn into the maps, so then you know where to paint. I believe that recent versions on Photoshop support the loading of 3D geometry as well, so you can see how the painted textures will appear on your model as you are painting.
You will then load the model with UV coordinates into C4D, and apply the painted color map before adding lights etc and rendering out your scene.
Phil
|
|
| Back to top |
|
|
r_knightly
Posts: 74
Joined: 29 Jun 2007
|
| Posted: Tue May 11, 2010 1:36 am Post subject: |
|
|
looks awesome. nice work 
|
|
| Back to top |
|
|
Josephus
Posts: 2
Joined: 10 May 2010
|
| Posted: Tue May 11, 2010 8:10 am Post subject: |
|
|
| headus wrote: | The basic work flow is that you load the model into UVLayout to create the UV coordinates (i.e. the flattened out pattern) and then save the model back out. You can also use the "Render" tool in UVLayout then to save the layout to blank texture maps.
If you load these maps into Photoshop you'll be able to see the UV coordinates drawn into the maps, so then you know where to paint. I believe that recent versions on Photoshop support the loading of 3D geometry as well, so you can see how the painted textures will appear on your model as you are painting.
You will then load the model with UV coordinates into C4D, and apply the painted color map before adding lights etc and rendering out your scene.
Phil |
Thanks Phil for the helpful explanation, I see the connection now. I will have to explore further what I can/can not do with PS (CS4) as far as painting in 3d and exporting out.
|
|
| Back to top |
|
|
SLI_Fallen
Posts: 66
Joined: 19 Dec 2008
|
| Posted: Fri May 14, 2010 6:13 am Post subject: |
|
|
| Note you will need to use the EXTENDED versions of Photoshop to have the 3D painting capability.
|
|
| Back to top |
|
|
|