Support:XYZRGB
From Headus Docs
(Difference between revisions)
| Revision as of 05:50, 26 April 2013 (edit) Headus (Talk | contribs) ← Previous diff |
Current revision (06:28, 26 April 2013) (edit) (undo) Headus (Talk | contribs) (→Head Scan Blended Color Maps) |
||
| (11 intermediate revisions not shown.) | |||
| Line 4: | Line 4: | ||
| == Head Scan Blended Color Maps == | == Head Scan Blended Color Maps == | ||
| - | Here's the steps to extract the blended color maps using CySlice. | + | Here's the procedure to extract the blended color maps using CySlice. |
| # The six camera mesh/texture pairs must have the exact same names as we received in the sample data. | # The six camera mesh/texture pairs must have the exact same names as we received in the sample data. | ||
| - | # The merged mesh with UVs must be called '''1x1.obj''' (green highlight in "Inputs" image). | + | # The merged mesh with UVs must be called '''1x1.obj''' (green highlight in "Inputs" image). The UVs should fit snugly within the 0-to-1 UV space. |
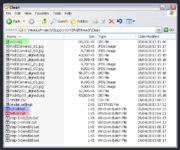
| # Copy the BAT and render settings files into that folder. | # Copy the BAT and render settings files into that folder. | ||
| - | # Edit the '''setvar.bat''' file to adjust CySlice install location | + | # Edit the '''setvar.bat''' file to adjust some settings: |
| + | ## The CySlice install location. | ||
| + | ## The number of render threads. If you have fewer than 4 CPU cores or less than 4Gb of RAM, you will need to reduce the default of 8 threads. | ||
| + | # Double click '''run-all.bat''' to start the map extract process: | ||
| + | ## All the OBJ files are converted to PLY. | ||
| + | ## 6 maps, one for each camera, are extracted using CySlice. | ||
| + | ## These are then blended. | ||
| - | === Inputs === | + | In the same folder you will find the output files: |
| - | + | # All the PLY and LOG files can be safely deleted (red highlight in "Outputs" image). | |
| - | + | # One resampled color map for each of the 6 cameras at 8k by 4k resolution (blue highlight). | |
| - | ; 1x1.obj : inout OBJ file wuith UIVS | + | # The blended color maps (green highlight). By default there are a selection of four maps with 1%, 2%, 4% and 8% blend widths. Create new '''step-3-blendXX.bat''' files and edit '''run-all.bat''' if you want a different selection of choices. |
| - | ; setvar.bat : edit to change settings | + | |
| - | ; run-all.bat : run this to ... | + | |
| - | + | ||
| - | {{img|XYZRGB-outputs.jpg|Map Extract Outputs}} | + | |
| - | + | ||
| - | === Outputs === | + | |
| - | + | ||
| - | ; PLY and LOG files : can be safely deleted | + | |
| - | ; Extracted Maps : .... | + | |
| - | ; Blended Maps : .... | + | |
Current revision
[edit] Head Scan Blended Color Maps
Here's the procedure to extract the blended color maps using CySlice.
- The six camera mesh/texture pairs must have the exact same names as we received in the sample data.
- The merged mesh with UVs must be called 1x1.obj (green highlight in "Inputs" image). The UVs should fit snugly within the 0-to-1 UV space.
- Copy the BAT and render settings files into that folder.
- Edit the setvar.bat file to adjust some settings:
- The CySlice install location.
- The number of render threads. If you have fewer than 4 CPU cores or less than 4Gb of RAM, you will need to reduce the default of 8 threads.
- Double click run-all.bat to start the map extract process:
- All the OBJ files are converted to PLY.
- 6 maps, one for each camera, are extracted using CySlice.
- These are then blended.
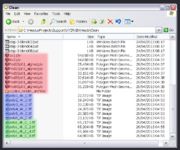
In the same folder you will find the output files:
- All the PLY and LOG files can be safely deleted (red highlight in "Outputs" image).
- One resampled color map for each of the 6 cameras at 8k by 4k resolution (blue highlight).
- The blended color maps (green highlight). By default there are a selection of four maps with 1%, 2%, 4% and 8% blend widths. Create new step-3-blendXX.bat files and edit run-all.bat if you want a different selection of choices.

