Support:UniSA
From Headus Docs
(Difference between revisions)
| Revision as of 06:01, 8 June 2010 (edit) Headus (Talk | contribs) (→Vitronic Color Import) ← Previous diff |
Revision as of 06:03, 8 June 2010 (edit) (undo) Headus (Talk | contribs) Next diff → |
||
| Line 15: | Line 15: | ||
| Load the PLY file into CySize and process as you normally would and the color | Load the PLY file into CySize and process as you normally would and the color | ||
| - | should end up in the final merged and filled surface. | + | should end up in the final merged and filled surface. You can then use the |
| + | "Place Landmarks" tool to quickly place points on all of your color markers. | ||
Revision as of 06:03, 8 June 2010

Fig 1. PlyTool Settings
Vitronic Color Import
To import Vitronic color scans into CySize, you need to follow these steps:
- Run PlyTool as you normally would.
- Tick the "UV to CPV" option (see Fig 1).
- Click the arrow and load the first color texture file.
- Set the rotation angles to 90, 0, 90.
- Click the Input arrow and load the OBJ file with Meters ticked (see Fig 2). Even if you already have an OBJ loaded, you need to reload it after ticking the "UV to CPV" option.
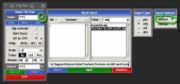 Fig 2. Load OBJ
 - Click the Output arrow and specify the PLY file as you normally would.
- Click Convert
- Click View, and use the 'C' key to shade the mesh with color to check the conversion.

Load the PLY file into CySize and process as you normally would and the color should end up in the final merged and filled surface. You can then use the "Place Landmarks" tool to quickly place points on all of your color markers.